Turning Your Home into a Mini Boxing Gym
Have you ever stood in front of a brand-new double end bag, gloves laced up, heart racing with excitement, only to realize you have no clue how to keep it from bouncing around like a runaway balloon? Yeah, I’ve been there too. That sinking feeling of “Wait, how do I actually anchor this thing at home?” hits harder than the punches you were planning to throw.
But here’s the good news: setting up a double end bag doesn’t have to be confusing, stressful, or expensive. Once you know the right methods, you can turn almost any corner of your home into a mini boxing gym. And honestly, that’s such a powerful feeling—imagine stepping into your living room, garage, or even your bedroom, and seeing your bag perfectly set up, ready to sharpen your speed, accuracy, and reflexes. It feels like a commitment to yourself, to your training, and to the discipline that boxing teaches.
In this guide, I’m going to show you exactly how to anchor a double end bag at home—step by step. We’ll talk about the tools you’ll need, different anchoring methods (from drilling to renter-friendly hacks), safety tips, and even some creative DIY tricks. Whether you’re a beginner just starting out or a seasoned fighter looking to upgrade your setup, this guide will make sure your bag is rock-solid, safe, and fun to use.
So, grab your gloves, clear a little space, and let’s build your perfect training setup together. Because once you get this right, every punch you throw will feel smoother, sharper, and way more satisfying.
What is a Double End Bag and Why Does It Matter?
Quick Overview of a Double End Bag
Alright, let’s start with the basics. A double end bag (sometimes called a floor-to-ceiling bag) is basically a small punching bag attached with elastic cords at both the top and bottom. It looks simple, but oh boy—it’s a beast when it comes to sharpening your boxing skills.
Unlike a heavy bag, which just hangs there and takes your punches, the double end bag fights back. It rebounds quickly, forcing you to improve your timing, precision, and reflexes. You miss a punch? It smacks you back. You’re too slow? The bag reminds you. It keeps you honest.
Why Anchoring is Crucial
Now, here’s the kicker. A double end bag only works well when it’s anchored correctly. If your anchors are weak or the cords are uneven, the bag will bounce around like a balloon at a kid’s birthday party. That’s not training—that’s frustration.
Can you imagine trying to focus on speed combos while the bag keeps flying across the room? I tried it once without a proper anchor, and let’s just say the bag had more fun than I did.
So yeah, anchoring isn’t just about stability. It’s about making your training effective, safe, and actually enjoyable.
Essential Equipment You’ll Need to Anchor a Double End Bag at Home
Before you even think about throwing that first jab, let’s talk about gear. A lot of beginners get tripped up here because they either buy way too much stuff they don’t need, or they try to cut corners and end up with a bag that feels like it’s held together with duct tape and hope. Neither is fun.
The truth? You don’t need a crazy shopping list or a fancy gym setup. But you do need a few key pieces of equipment to make sure your double end bag is stable, safe, and actually useful for training. Let’s break it down.
The Double End Bag Itself
Okay, obvious first step—but not all bags are created equal.
- Size matters. Smaller bags move faster and challenge your reflexes, while bigger bags are easier to hit and better for beginners.
- Material check. Go for real or synthetic leather. Cheap vinyl bags can tear quickly, especially if you train hard.
- Shape and rebound. Some bags are rounder, others are teardrop-shaped. Pick one that feels comfortable for your style.
Tip: If you’re brand new, start with a medium-sized bag. It’ll give you enough rebound speed to learn without feeling impossible to hit.
Elastic Cords (a.k.a. The Lifeline of the Bag)
Without cords, your double end bag is basically a soccer ball on a string. These stretchy guys are what make the bag bounce back toward you.
- Most bags come with cords included, but here’s the deal: many stock cords are too short, too stiff, or just plain cheap.
- Good cords = consistent rebound and durability. Weak cords = frustration (and lots of tangled messes).
- You can upgrade to high-quality bungee cords if needed. They last longer and give smoother movement.
Pro tip: Have a backup set of cords. They wear out faster than you think, and nothing kills a workout faster than a snapped cord mid-session.
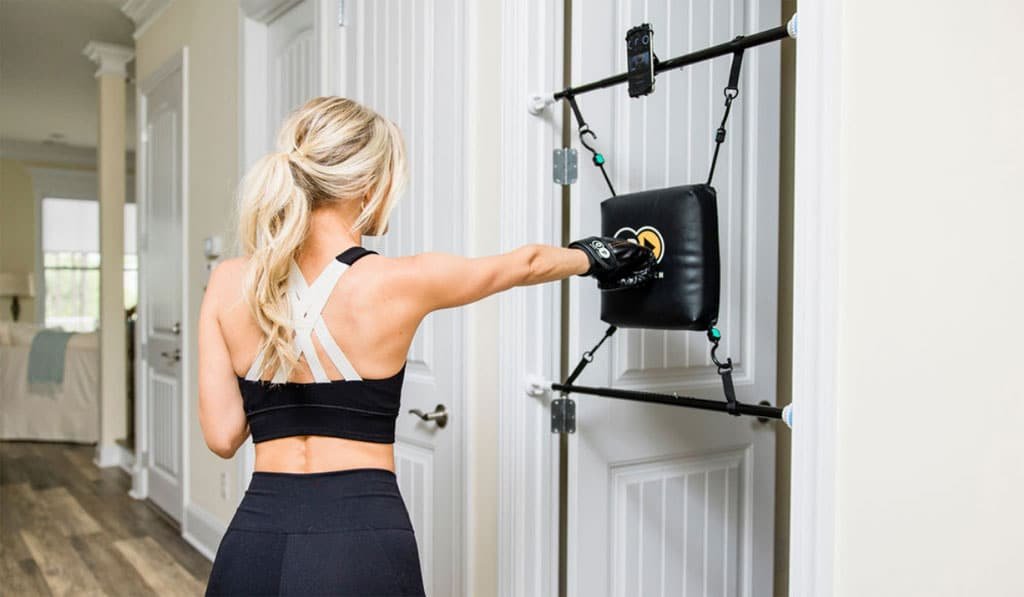
Top Anchor (Ceiling Mount)
This is what holds the bag from above, so it needs to be solid.
Your options include:
- Ceiling hooks or eye bolts. Great for permanent setups—just drill them into concrete or wooden beams.
- Beam clamps. If you’ve got exposed beams, these clamp on without drilling.
- Suction cup anchors. Perfect for renters or temporary setups—just press and stick on a smooth surface.
Make sure the top anchor is strong. If it pops loose while you’re mid-combo, let’s just say it’s not going to end well.
Bottom Anchor (Floor Mount)
The bottom anchor balances the bag and keeps it from flying around like a balloon on a windy day.
Options include:
- Floor eye bolts. The most stable choice, but requires drilling into the floor.
- Weighted anchors. Think sandbags, kettlebells, or stacked dumbbells. Great for renters and portable setups.
- DIY anchors. A cement-filled bucket with a hook works surprisingly well. Even tying it to a heavy sofa leg is an option.
The bottom anchor doesn’t have to be fancy—it just has to be heavy and reliable.
Carabiners and Clips (Optional, But Super Handy)
These little guys aren’t strictly necessary, but they make your life so much easier.
- Clip cords on and off in seconds.
- Swap anchors without retying knots.
- Adjust tension quickly during training.
Once you use carabiners, you’ll never go back to fiddling with knots.
Weights or Sandbags (For Extra Stability)
Even if you’re using a solid anchor, sometimes adding extra weight helps keep everything locked down. A couple of kettle-bells, dumbbells, or a sandbag can give you that extra peace of mind.
Protective Gear (For You, Not the Bag)
Not technically “equipment for anchoring,” but I’d argue it’s essential.
You need:
- Hand wraps – to protect your knuckles and wrists.
- Boxing gloves – hitting bare-knuckled might sound tough, but it’ll wreck your hands (and your bag).
Trust me, protecting your hands is non-negotiable if you want to train long-term.
Budget vs Premium Options
Here’s the thing: you don’t have to spend a fortune.
A double end bag setup can be as cheap or as fancy as you want:
- Budget setup – Use the cords that come with the bag, tie them to a kettlebell on the floor and a ceiling hook, and you’re good.
- Premium setup – High-end bag, pro-grade cords, heavy-duty mounts, and maybe even a quick-adjust tension system. Smooth, durable, and gym-level quality.
At the end of the day, both setups get the job done. It just depends on how much you’re willing to invest upfront.
Wrapping It Up
So, here’s the golden rule: don’t overcomplicate it. All you really need is the bag, strong cords, something secure above, and something solid below. Everything else—carabiners, fancy mounts, extra weights—is just icing on the cake.
The key is stability. If your setup feels solid and safe, you’ll enjoy your training a hundred times more. And honestly, once you get your gear sorted, every punch feels smoother, every combo flows better, and you’ll actually look forward to stepping up to the bag.
Different Ways to Anchor a Double End Bag at Home
Now we get to the fun part: exploring your options. Depending on your home, budget, and whether you’re okay with drilling, you’ve got multiple ways to anchor.
Ceiling and Floor Anchoring
The classic setup. Drill a hook or eye bolt into the ceiling, and another into the floor. Attach your cords, adjust the tension, and boom—you’ve got a pro-style setup.
But here’s the catch: your ceiling type matters.
- Concrete ceiling – strongest option.
- Wooden beams – solid, but make sure you hit the beam, not drywall.
- Drywall – nope, don’t even try.
For the floor, you can install a bolt if you own the place. But if you’re renting, maybe skip the drilling (unless you want your landlord breathing down your neck).
Anchoring with Weights
Don’t want to drill? No problem. Just use weights.
Sandbags, kettle-bells, or even a couple of stacked dumbbells can do the trick. Just tie the bottom cord around the weight and you’re good. This is my personal favorite when I train in a rented apartment—zero damage, zero stress.
Suction Cup Anchors
These are awesome if you’ve got smooth surfaces like tile or hardwood. You just stick them to the floor or ceiling, and they hold surprisingly well. Not perfect for super intense training, but definitely convenient.
DIY Anchoring Hacks
Here’s where creativity kicks in:
- Tie the bottom cord to a heavy sofa leg.
- Fill a bucket with cement, drop a hook in, and use it as a portable anchor.
- Use a sturdy storage trunk or toolbox filled with bricks.
The best part? You don’t need a huge budget to make this work. Sometimes the scrappy DIY solutions are even more satisfying.
Step-by-Step Guide: How to Anchor a Double End Bag at Home
Alright, now we’re getting into the fun part—the actual setup. Don’t worry if you’re not super handy with tools or if the thought of drilling gives you flashbacks to a DIY disaster. Anchoring a double end bag is way less intimidating than it sounds. Follow these steps, and you’ll have a setup that feels stable, safe, and ready for action.
Pick the Perfect Spot
First things first—location matters more than you think.
- Look for open space where you can move freely around the bag. At least 6–8 feet of clearance is ideal.
- Avoid tight corners or being too close to walls—otherwise, you’ll constantly feel cramped.
- Think safety: keep it away from fragile items like TVs, lamps, or glass furniture (trust me, one wild punch and things get messy fast).
- Bonus tip: good lighting helps. You want to see that bag clearly as it snaps back toward you.
Ask yourself: “Can I move, duck, and throw combos without bumping into anything?” If the answer is yes, you’ve found your spot.
Secure the Top Anchor
This is where the bag hangs from, so it needs to be solid.
The method depends on your ceiling type:
- Concrete ceiling – Drill in a heavy-duty eye bolt or hook. This is rock-solid and will last forever.
- Wooden beam – Find the beam (a stud finder helps), drill directly into it, and attach your hook. Avoid drywall—it won’t hold.
- No-drill option – Use a suction cup anchor or a beam clamp if drilling isn’t possible. These are renter-friendly and quick to set up.
Make sure whatever you use can handle the tension of elastic cords being pulled and snapped repeatedly. A flimsy hook won’t cut it.
Secure the Bottom Anchor
The bottom anchor keeps the bag balanced and prevents it from flying around uncontrollably.
You’ve got options here too:
- Permanent method – Install a floor eye bolt. Super stable, but it means drilling into your floor (best for garages or basements).
- Weighted anchors – Use sandbags, weight plates, kettlebells, or even a stack of dumbbells. Tie the cord around them, and you’re good.
- Suction cups – Perfect if you’ve got smooth tile or hardwood floors. Just press, lock, and attach the cord.
- DIY hack – Tie it to a heavy sofa leg or build your own cement-filled bucket anchor. Cheap but effective.
Pro tip: If you’re using weights, make sure they’re heavy enough to resist movement. Nothing’s more annoying than chasing your anchor across the room mid-combo.
Attach the Bag and Adjust the Tension
Now comes the part that makes the bag come alive—cord tension.
- Clip or tie the elastic cords to the top and bottom anchors.
- Adjust the length: shorter cords = tighter rebound, longer cords = slower rebound.
- Test different setups. If the bag feels stiff and hardly moves, loosen it a little. If it’s swinging wildly and feels unpredictable, tighten it up.
The goal is to hit that sweet spot where the bag rebounds fast enough to challenge your reflexes but not so fast that it feels impossible to control.
Test and Fine-Tune
This is where you step into fighter mode.
- Start with light jabs. Watch how the bag moves.
- Add in combos—jab-cross, hook-jab—and see if the rhythm feels natural.
- If the bag isn’t bouncing back straight, check if the cords are even. Sometimes one side is tighter than the other.
- Don’t be afraid to tweak it a few times. The setup might take 10–15 minutes of adjustments, but once you nail it, training becomes so much smoother.
Imagine it: the bag snaps back at you perfectly, forcing you to move your head, throw quick counters, and stay sharp. That’s the magic of a well-anchored double end bag.
Safety Check (Bonus but Crucial)
Before you unleash full power, do a quick inspection:
- Are the anchors tight and secure?
- Are the cords in good shape, no frays or tears?
- Is the area around you clear from hazards?
A 2-minute check now saves you from accidents later.
Wrapping Up the Setup
And just like that, you’ve anchored your double end bag at home. It doesn’t matter whether you drilled into beams, tied it to a kettle-bell, or used a DIY hack—what matters is that it’s stable, safe, and ready for you.
Now every time you step up to it, you’ll feel the difference. A solid setup makes your training sharper, smoother, and way more enjoyable. Honestly, that’s when boxing starts feeling addictive—the rhythm, the flow, the challenge.
So, glove up and get punching—your anchored bag is ready to test your speed and accuracy.
Safety Tips When Anchoring and Using a Double End Bag
You’re probably eager to start punching, but safety first, my friend.
- Inspect anchors regularly – loose screws or worn cords can snap mid-session.
- Use the right tension – too much tension puts strain on anchors; too little makes training sloppy.
- Protect yourself – always wear hand wraps and gloves.
- Protect your home – keep the area clear; you don’t want broken lamps or chipped walls.
Common Mistakes to Avoid
- Over-tightening the cords (makes the bag stiff).
- Using weak anchors (hello, accidents).
- Placing it too close to walls or furniture.
- Ignoring wear and tear on cords.
Best Practices for Long-Term Use
Want your setup to last?
Follow these:
- Store cords properly when not in use.
- Rotate anchors if possible to spread out wear.
- Upgrade cords or anchors if they look worn.
- Maintain balance—flexibility plus stability.
Comparing Anchoring Methods: Finding What Really Works at Home
When it comes to setting up a double end bag, there isn’t just one “perfect” way. The truth is, the best method depends on your space, your budget, and even your lifestyle. Some setups are rock-solid and feel like they came straight out of a pro gym, while others are portable, flexible, and super renter-friendly. Let’s walk through the main options, and I’ll break down the good and the not-so-good of each.
Ceiling and Floor Anchors – The Classic Setup
The Good:
- Super stable—once installed, your bag won’t budge.
- Gives you the most realistic rebound and speed.
- Long-lasting; you don’t have to reset it every time you train.
- Feels professional—like you’re stepping into a real gym.
The Not-So-Good:
- Requires drilling holes, which isn’t ideal for renters.
- Setup takes time and some tools.
- Harder to move if you want to change locations.
If you own your space and want a permanent, gym-level setup, this is gold. But if you’re worried about holes in the ceiling or floor, you might want to skip it.
Weighted Anchors – The Renter’s Best Friend
The Good:
- No drilling required—completely damage-free.
- Super flexible—you can move the bag anywhere in the room.
- Easy to set up with things you may already have (like sandbags or kettle-bells).
- Affordable compared to permanent hardware.
The Not-So-Good:
- If the weight isn’t heavy enough, the bag may shift or slide.
- Doesn’t always feel as solid as a bolted-down setup.
- Can take up a bit of floor space if you’re using big weights.
This is hands-down the most practical method for renters or anyone who wants a setup that’s easy to move around.
Suction Cup Anchors – Quick and Convenient
The Good:
- Fastest setup—literally stick it and go.
- Great for smooth surfaces like tile, hardwood, or concrete.
- Portable—you can remove it after training.
- No damage to floors or ceilings.
The Not-So-Good:
- Suction can weaken mid-session, especially with hard punches.
- Doesn’t work on textured or carpeted surfaces.
- Not built for long, intense daily use.
Think of suction cups as a temporary or light-use option. They’re super convenient, but don’t expect them to handle pro-level workouts every day.
DIY Anchors – Creative, Affordable, and Fun
The Good:
- Extremely budget-friendly—you can use stuff you already own.
- Endless creativity—cement buckets, furniture legs, toolboxes filled with bricks…the list goes on.
- Portable if you build something smart, like a weighted base.
- Gives you a sense of pride—it’s your custom setup.
The Not-So-Good:
- Not always reliable—depends on how well you build it.
- Might not look as neat or professional.
- Can be a little bulky or awkward to move.
DIY anchors are perfect if you enjoy problem-solving and want to save money. Just make sure whatever you build is safe and sturdy enough to handle punches.
Final Thoughts on Anchoring Choices
Each anchoring method comes with its own trade-offs. Permanent ceiling-and-floor anchors give you the most professional feel, but weighted or suction setups offer flexibility and zero damage. DIY anchors, meanwhile, give you total freedom to experiment without breaking the bank.
The trick is to choose the one that fits your situation best. Ask yourself: Do I need something permanent? Do I want portability? Am I okay with drilling? Once you answer those, the choice becomes super clear.
Because at the end of the day, anchoring your double end bag isn’t just about stability—it’s about creating a training setup that actually works for you, your home, and your goals.
Anchoring More Than Just a Bag
When you first think about setting up a double end bag at home, it can feel like a puzzle. Where do you put it? Do you need to drill holes? What if you’re renting? At first glance, all these questions make the process seem complicated. But once you break it down, you realize it’s not just about equipment—it’s about creativity, consistency, and building your own training space.
Learning how to anchor a double end bag at home isn’t only about keeping the bag steady. It’s about creating a space that motivates you to move, to push yourself, and to sharpen your skills day after day. Whether you chose a solid ceiling-and-floor setup, a clever sandbag hack, or even a DIY solution with weights and furniture, you’ve taken a step closer to turning your home into a place where growth happens.
And honestly? That feels empowering. There’s something special about walking past your bag and knowing it’s there, waiting for you—not at a gym across town, not behind a membership fee, but right in your own space. It’s a reminder that discipline lives here, inside your daily environment.
So, my friend, don’t overthink it. Anchor your bag, test it out, and start training. Feel that rhythm as the bag snaps back at you. Let it challenge you, frustrate you, and then push you to become faster, sharper, and more focused.
Because in the end, anchoring a double end bag at home is more than a setup—it’s a promise to yourself. A promise that no matter what, you’re showing up, improving, and staying anchored to your goals.
Please read more about the best double end bag.
FAQs
Can you set up a double end bag without drilling?
Yes! Use sandbags, kettlebells, or suction cup anchors to avoid drilling holes. Perfect for renters.
How much space do you need for a double end bag?
Ideally, at least 6–8 feet of open space around the bag so you can move freely.
What’s the best anchor for renters?
Weighted anchors (like dumbbells or sandbags) or suction cups are renter-friendly and non-damaging.
How do you adjust tension on a double end bag?
By shortening or lengthening the elastic cords. Aim for a balance where the bag rebounds quickly but not uncontrollably.
Can you use outdoor setups for double end bags?
Yes! Just make sure your anchors are weather-resistant, and avoid leaving the bag outside for too long.